Search Our Knowledgebase (Mac)
To eFile Print & Mail forms from your payroll program, you must first set up a user account at efile.aatrix.com:
- Once you have the account set up, log in on the website and click on the "Company" tab.
- On the right side, click on the "Print eFile Authorization". Verify the information is correct, sign it and fax it to the number it.
NOTE: No filings will be processed until we receive the authorization form.
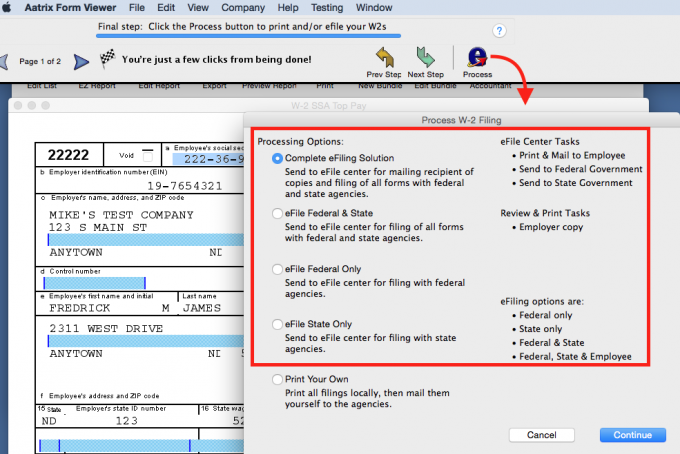
- After you have processed your W-2's and have completed the verification steps, click the "Process" button on the top tool bar.
- There are several eFile options for the W-2's:
- Complete eFiling Solution
We will print and send out the employee copies and file all forms with the Federal and State agencies as required.
You print the company copy of the W-2's for your records.
- eFile Federal & State
We will file all forms to the Federal and State agencies as required.
You print the company copy for your records and your employee copies for distribution.
- eFile Federal Only
We will file all forms with the Federal agency as required.
You print the company copy for your records, the employee copy for distribution and the State copy for filing, if required.
- eFile State Only
We will file all forms with the State agency as required.
You print the company copy for your records, the employee copy for distribution and the SSA copy on the red SSA W-2 forms and the W-3 on the red copy for filing with the Federal SSA.
- After you have chosen the eFile option, click on the "Continue" to take you to the Process W-2 Filing screen.

- This is where you will print the necessary W-2's prior to eFiling.
The first one printed is the Employer copy of the W-2's. They are printed with 4 employees on a page on plain paper for your records. Click the "Print" button.
- If you chose the Complete eFile Solution, click the "eFile" button.
- If you chose one of the other eFile options, click the "Continue" button and you will be taken through the steps to print the remaining forms as necessary.
After printing the last copies needed click the "eFile" button to continue.
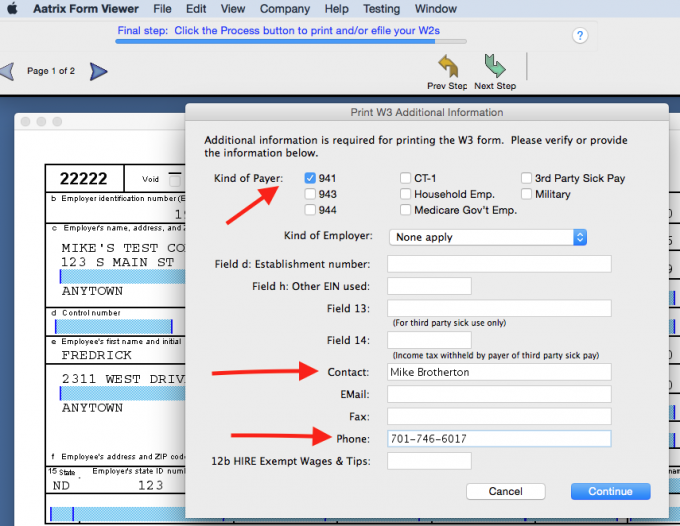
- In the "W-3 Options" box, select the "Kind of Payer", for most people this will be 941, enter the contact and phone then click "Continue".

- Some state require a reconciliation form to be filed with the W-2's.
If required, a warning box will pop up stating the form has been added and needs to be completed. Click "OK".
- Fill in all red fields on the state form added to the filing and review all pages. Click the "Next Step" button. Read the statement in the window and when you are ready to continue click "Agree".
- In the next window, click "Continue".
You will be brought to the printing steps, click the "Continue" button until you see the "eFile" button.
Click the "eFile" button and click "Continue" and the eFile Client will open up.
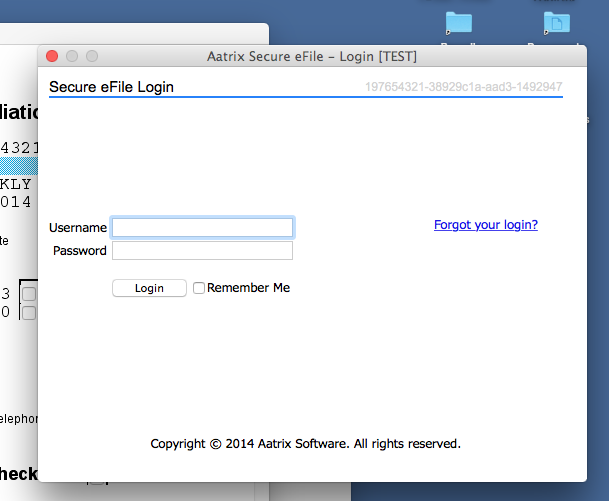
- Enter your Username and Password and click "Login".

- Verify the Enrollment Information is correct and click "Next".
- The next window will give you the pricing for the W-2 filing. Please note that the eFiling of W-2's are not included in any forms package that you purchased. Click "Next" to continue.
- Next, you will arrive at the "Choose Submission Date" window. There are some that you can choose when they will be filed.
Aatrix recommends choosing the latest filing date possible for submission. Once the submission dates have been chosen, click on the "Next" button.
- This window is where you will enter the credit card information for the filing charges.
When you enter the card number do not use spaces. The name and address must match the person and address the bill for the card is sent to. Once the information has been entered, click "Next".
- This will bring you to an overview of the filing. Verify the information is correct and click the "Submit" button.
- The last step will give you the AFID (Filing number). The confirmation for the filing and the AFID number will be sent to the email address shown.
- Click "Close" to return to the W-2 screen.
- Click "Continue" to save the filing on your computer.
- Quit out of the Form Viewer.